Sorry it has been a while since my last update - I've been busy working on my dolls house. I want to show you my progress from start to finish so here is what I've done so far...
For my 30th birthday my fiancé bought me a Magpies shop kit from the Dolls House Emporium. As I couldn't make up my mind what kind of 'shop' it should be it has sat half finished in the corner of my living room for the past two years. During that time I have imagined it as a Victorian toy shop, a florist's, a tea room, a cafe/ deli and an Italian restaurant - I could never decide!

Last month I finally decided on a theme I was happy with - 1940s living quarters with a general store below so I set to work planning how I would decorate my house/ shop. I've always been fascinated by WW2 and what life and living conditions were like in Britain so I found Pinterest a very useful source of information for 1930s/ 1940s decor... colours, wallpaper patterns, furniture styles.
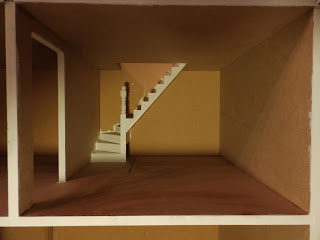
During the war, the kitchen was the heart of the home so I thought that this would be a good place to start. The photograph above is what my kitchen looked like before I made a start on it. In many of the kitchens I looked at on Pinterest I found that yellow/ magnolia and green were popular colour choices for the walls. I began by painting the ceiling with some leftover white vinyl silk paint. I used about three or four coats to get a decent coverage over the MDF. I then painted the kitchen walls and back staircase wall with a Dulux paint tester pot in 'Buttermilk'. This took three coats.

Once this had dried I measured 3.5 inches from the kitchen floor and drew a straight line in pencil around the walls. Using the line as a guide, I painted the bottom half of the wall in a dark green coloured paint by Dulux called 'Heathland'. I deliberately chose a shiny, gloss type paint as during this time walls would have been painted with gloss for practical reasons as it was easily washable. I tried to get a straight line as best I could but it every time I tried I just kept messing it up. I think it may have been a lot easier had I painted the walls before gluing the kit together but nevermind! My fiancé suggested using a dado rail or a wallpaper border which would make the finish look neater. I decided to go for a thin picture rail to use in place of a dado rail as I didn't want it to be too big or protrude too far from the wall. I will add this later...
I gave the staircase a coat of white satin paint. I didn't want the stairs to be too shiny so I chose this instead of gloss paint (which also tends to go yellow after a while). I then looked at kitchen flooring and decided to go for black and white square tiles as they were pretty popular in kitchens during that time. I fell in love with some black and white stone tiles but they were so expensive and I thought that because the kitchen was on the first floor it would be unlikely that stone tiles were laid on wooden floors. Instead I found some vinyl black and white tiles by Richard Stacey which have more of a linoleum look which I'm very pleased with. They were very easy to lay as well... time consuming but easy. I started in the bottom left hand corner and glued them in place using tacky glue. I glued tiles in the space under the stairs as well (even though you won't see all of them) I thought that this would be much easier before I attached the pantry wall.


It was not until the 1950's that fitted kitchens were introduced so I realised that I had to make the best use of space in my kitchen. I was keen to turn the space under the stairs into a pantry where the homeowner could store food items, pans and cleaning products. To create my pantry I measured the space under the stairs and my uncle cut the shape out of plywood for me (I have no woodworking skills whatsoever!). I sourced the perfect door for my pantry from the Dolls House Emporium.

I glued it together so it opened out to the left rather than the right (which would block the wall space on the right side wall). I then painted it in the same dark green colour I used for the bottom half of the walls. I drew around the door on the plywood shape and my fiancé cut it out.

I sanded down the rough areas and glued the door in place.

I have ordered some shelves to go inside my pantry so I will fit these before I glue the plywood wall section in place. This is an idea of what it will look like in the room once it is fitted in place...

For my 30th birthday my fiancé bought me a Magpies shop kit from the Dolls House Emporium. As I couldn't make up my mind what kind of 'shop' it should be it has sat half finished in the corner of my living room for the past two years. During that time I have imagined it as a Victorian toy shop, a florist's, a tea room, a cafe/ deli and an Italian restaurant - I could never decide!


During the war, the kitchen was the heart of the home so I thought that this would be a good place to start. The photograph above is what my kitchen looked like before I made a start on it. In many of the kitchens I looked at on Pinterest I found that yellow/ magnolia and green were popular colour choices for the walls. I began by painting the ceiling with some leftover white vinyl silk paint. I used about three or four coats to get a decent coverage over the MDF. I then painted the kitchen walls and back staircase wall with a Dulux paint tester pot in 'Buttermilk'. This took three coats.

Once this had dried I measured 3.5 inches from the kitchen floor and drew a straight line in pencil around the walls. Using the line as a guide, I painted the bottom half of the wall in a dark green coloured paint by Dulux called 'Heathland'. I deliberately chose a shiny, gloss type paint as during this time walls would have been painted with gloss for practical reasons as it was easily washable. I tried to get a straight line as best I could but it every time I tried I just kept messing it up. I think it may have been a lot easier had I painted the walls before gluing the kit together but nevermind! My fiancé suggested using a dado rail or a wallpaper border which would make the finish look neater. I decided to go for a thin picture rail to use in place of a dado rail as I didn't want it to be too big or protrude too far from the wall. I will add this later...
I gave the staircase a coat of white satin paint. I didn't want the stairs to be too shiny so I chose this instead of gloss paint (which also tends to go yellow after a while). I then looked at kitchen flooring and decided to go for black and white square tiles as they were pretty popular in kitchens during that time. I fell in love with some black and white stone tiles but they were so expensive and I thought that because the kitchen was on the first floor it would be unlikely that stone tiles were laid on wooden floors. Instead I found some vinyl black and white tiles by Richard Stacey which have more of a linoleum look which I'm very pleased with. They were very easy to lay as well... time consuming but easy. I started in the bottom left hand corner and glued them in place using tacky glue. I glued tiles in the space under the stairs as well (even though you won't see all of them) I thought that this would be much easier before I attached the pantry wall.


It was not until the 1950's that fitted kitchens were introduced so I realised that I had to make the best use of space in my kitchen. I was keen to turn the space under the stairs into a pantry where the homeowner could store food items, pans and cleaning products. To create my pantry I measured the space under the stairs and my uncle cut the shape out of plywood for me (I have no woodworking skills whatsoever!). I sourced the perfect door for my pantry from the Dolls House Emporium.

I glued it together so it opened out to the left rather than the right (which would block the wall space on the right side wall). I then painted it in the same dark green colour I used for the bottom half of the walls. I drew around the door on the plywood shape and my fiancé cut it out.

I sanded down the rough areas and glued the door in place.

I have ordered some shelves to go inside my pantry so I will fit these before I glue the plywood wall section in place. This is an idea of what it will look like in the room once it is fitted in place...

No comments:
Post a Comment